In the world of computer networking, having the right cable can make all the difference in ensuring smooth and direct communication between devices. One such essential tool for networking professionals and DIY enthusiasts is the crossover cable. But what exactly is a crossover cable, and how do you make one yourself?
In this guide, we’ll break down everything you need to know about crossover cables—from their function and use cases to a step-by-step tutorial on how to make a crossover cable at home using simple tools.
What Is a Crossover Cable?
A crossover cable is a type of Ethernet cable designed to connect two similar networking devices directly. Unlike a straight-through Ethernet cable—which connects different types of devices, such as a computer to a switch or router—a crossover cable connects like devices. For example:
- Computer to computer
- Switch to switch
- Hub to hub
- Router to router (in certain setups)
The key difference lies in how the wires inside the cable are arranged. A crossover cable crosses the transmit and receive signal pairs, enabling devices of the same type to communicate without the need for an intermediary device.
Why Would You Need a Crossover Cable?
While most modern networking hardware includes Auto MDI-X (Medium Dependent Interface Crossover) functionality, which automatically detects and adjusts the cable configuration, there are still scenarios where a crossover cable is necessary:
- Connecting older computers directly
- Configuring or testing networking equipment
- Troubleshooting device-to-device communication
- Creating small, temporary peer-to-peer networks
If you’re working with legacy devices or want to ensure reliable direct communication between two similar devices, knowing how to make a crossover cable can be extremely beneficial.
Tools and Materials Needed to Make a Crossover Cable
Before getting started, gather the following items:
Required Tools:
- Ethernet cable (Cat5e or Cat6) – Preferably unshielded twisted pair (UTP)
- 2 RJ-45 connectors
- Crimping tool – Specifically for RJ-45 connectors
- Cable stripper or precision knife
- Cable tester (optional but highly recommended)
Optional:
- Wire cutters
- Labeling tape – To identify the cable after it’s made
Crossover Cable Wiring Standards
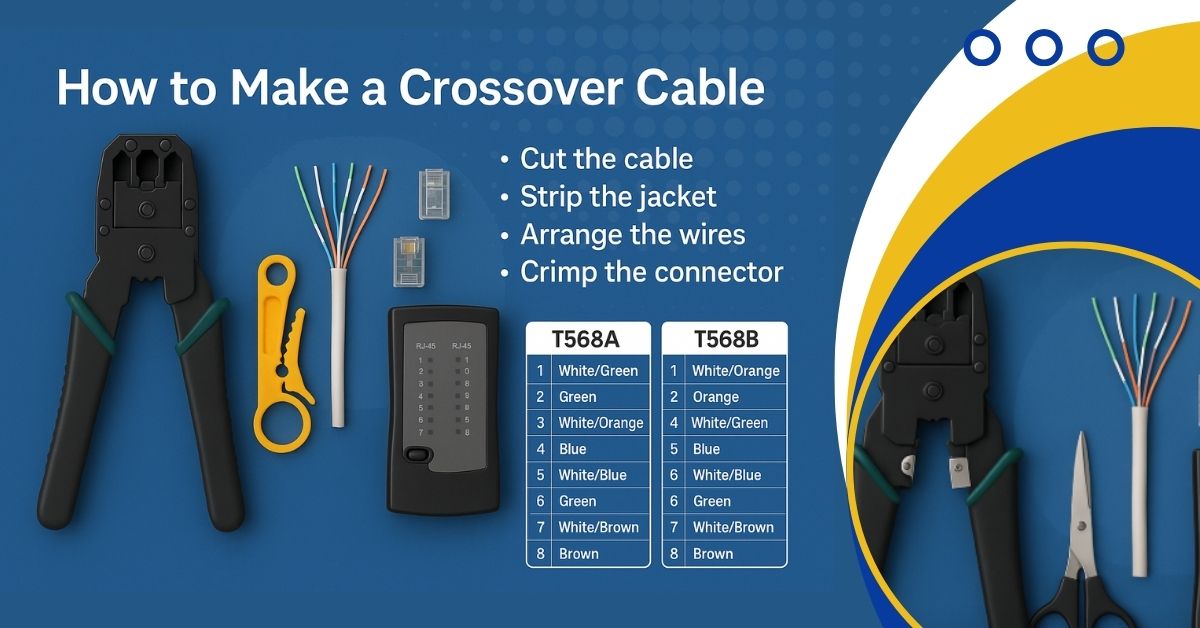
To make a crossover cable, you’ll need to understand the T568A and T568B wiring standards. These are two different pinout configurations for Ethernet cables. To create a crossover effect, one end of the cable must follow T568A and the other T568B.
T568A Pinout:
- White/Green
- Green
- White/Orange
- Blue
- White/Blue
- Orange
- White/Brown
- Brown
T568B Pinout:
- White/Orange
- Orange
- White/Green
- Blue
- White/Blue
- Green
- White/Brown
- Brown
In a crossover cable:
- Pin 1 (TX+) on one end connects to Pin 3 (RX+) on the other
- Pin 2 (TX−) connects to Pin 6 (RX−), and vice versa
This crossover of signal pairs allows both devices to send and receive data effectively.
Step-by-Step: How to Make a Crossover Cable
Step 1: Cut the Cable
Using a wire cutter or scissors, cut your Ethernet cable to your desired length. A good rule of thumb is to give yourself a few extra inches to work with during setup and testing.
Step 2: Strip the Outer Jacket
Use a cable stripper to carefully remove about 1 inch (2.5 cm) of the outer jacket from both ends of the cable. Be gentle to avoid cutting or damaging the internal wires.
Step 3: Untwist and Arrange the Wires
Untwist the exposed wire pairs and straighten them out. Arrange one end in T568A order and the other in T568B order.
Pro Tip: Flatten the wires with your fingers or use a small straight edge to keep them in alignment. This makes insertion into the RJ-45 plug easier.
Step 4: Trim the Wires Evenly
With the wires in the correct order, trim them to about 1/2 inch (1.25 cm) so they are uniform in length. This ensures a snug fit into the RJ-45 connector.
Step 5: Insert Wires into RJ-45 Connectors
Insert the wires into an RJ-45 plug, making sure they go all the way to the end of the connector and maintain their correct order. The clip side of the plug should be facing down when you insert the wires.
Repeat the process on the other end of the cable with the opposite wiring standard.
Step 6: Crimp the Connectors
Place the RJ-45 plug into the crimping tool and press firmly to lock the wires in place. This ensures the metal pins in the connector pierce the insulation and make contact with the copper wires.
Repeat this step on the second connector.
Step 7: Test Your Cable
Use a cable tester to verify that all pins are correctly connected and that the cable functions as a crossover. This step ensures reliable performance and saves troubleshooting time later.
Common Mistakes to Avoid
While making a crossover cable is fairly straightforward, here are some common mistakes to watch out for:
- Incorrect wire order – Double-check your T568A and T568B pinouts
- Poor crimping – Always use a proper crimping tool
- Damaged wires – Be careful not to nick the internal wires while stripping the jacket
- Uneven wire length – This can prevent the wires from fully seating into the RJ-45 connector
Taking your time and double-checking each step will save you from future headaches.
Crossover Cable vs. Straight-Through Cable
Here’s a quick comparison:
| Feature | Crossover Cable | Straight-Through Cable |
| Connects | Similar devices | Different devices |
| Pin Configuration | One end T568A, one end T568B | Both ends same (T568A or T568B) |
| Use Case | PC to PC, switch to switch | PC to switch, router to PC |
| Common Today? | Less common (Auto MDI-X) | Standard for most networks |
Final Thoughts
Learning how to make a crossover cable is a valuable skill for IT professionals, network engineers, and even tech-savvy home users. Whether you’re troubleshooting network issues, setting up a lab environment, or connecting two computers directly, a homemade crossover cable gives you flexibility and control.
By understanding the differences in wiring standards and following the correct steps, you can easily create your own crossover cable with minimal cost and effort. Plus, it’s a great way to build your networking confidence and toolkit.
FAQs About Crossover Cables
Can I use a crossover cable with modern devices?
Yes, but many modern devices have Auto MDI-X, which makes crossover cables unnecessary. However, they still work if needed.
What’s the maximum length for a crossover cable?
Like all Ethernet cables, the maximum recommended length is 100 meters (328 feet).
Can I use any type of Ethernet cable to make a crossover cable?
Cat5e and Cat6 are the most commonly used for Ethernet crossover cables.
What is the purpose of a crossover cable?
A crossover cable is used to directly connect two similar networking devices—such as two computers or two switches—without the need for a hub, switch, or router. It allows data to transmit and receive by crossing over the transmit (TX) and receive (RX) signal wires.
What’s the difference between a crossover cable and a straight-through cable?
A straight-through cable uses the same wiring standard on both ends (T568A or T568B), making it ideal for connecting different types of devices (e.g., PC to router). A crossover cable has different standards on each end (T568A on one end and T568B on the other) and is used to connect similar devices directly.
Can I use a crossover cable with modern devices?
Yes, but many modern devices come with Auto MDI-X capability, which automatically detects and adjusts for crossover configurations. Still, a crossover cable is useful for older devices or testing purposes.
What types of Ethernet cable can be used to make a crossover cable?
You can use Cat5, Cat5e, or Cat6 cables to make a crossover cable. Just ensure both ends have the correct pinout configuration and the quality of the cable meets your speed and performance needs.
What are the T568A and T568B standards?
T568A and T568B are two wiring standards for arranging the twisted-pair wires inside Ethernet cables. In a crossover cable, one end is wired using the T568A standard and the other end with T568B.
How do I test if my crossover cable works?
Use a network cable tester to verify that all pins are properly connected and that the crossover wiring is correctly done. Alternatively, try connecting two devices directly and check if they can communicate.
Do crossover cables support gigabit Ethernet?
Yes, crossover cables can support Gigabit Ethernet (1000 Mbps), especially if made with high-quality Cat5e or Cat6 cables. Gigabit Ethernet uses all four wire pairs, and most devices can auto-configure the connections.
Is a crimping tool necessary to make a crossover cable?
Yes, a crimping tool is essential for attaching the RJ-45 connectors to the Ethernet cable securely. It ensures proper pin contact for data transmission.
What length should a crossover cable be?
A crossover cable can be any length up to 100 meters (328 feet), which is the maximum length for Ethernet cables without signal degradation.
Can I convert a straight-through cable into a crossover cable?
Yes, you can convert one end of a straight-through cable by replacing the RJ-45 connector and rewiring it to follow the opposite wiring standard (e.g., change one end from T568B to T568A).